Learn to read fish finder sonar like a Canadian guide — fish arches, bottom hardness, bait clouds, thermoclines, ice fishing sonar, and the 5 settings every Canadian angler needs to change right now.
- Match Your Fish Finder Is Lying to You — Here's What the Screen Is Actually Showing to your water, season, boat size, and actual skill level instead of buying by specs alone
- Prioritize readable controls, durable construction, and Canada-relevant use cases before chasing premium features
- Use the guide to compare what matters in the field: setup time, reliability, safety, storage, and upgrade path
Bottom line The right Your Fish Finder Is Lying to You — Here's What the Screen Is Actually Showing choice solves your real Canadian trip conditions without adding gear you…
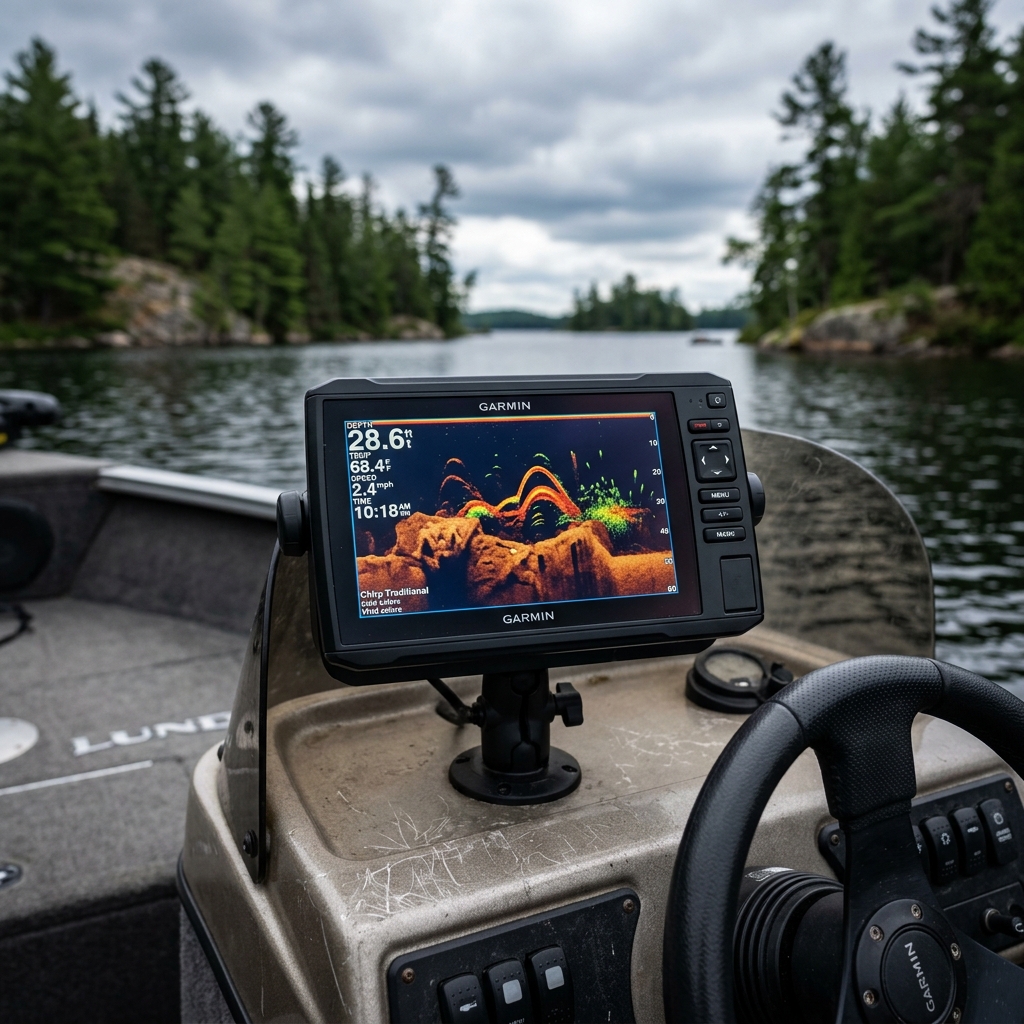
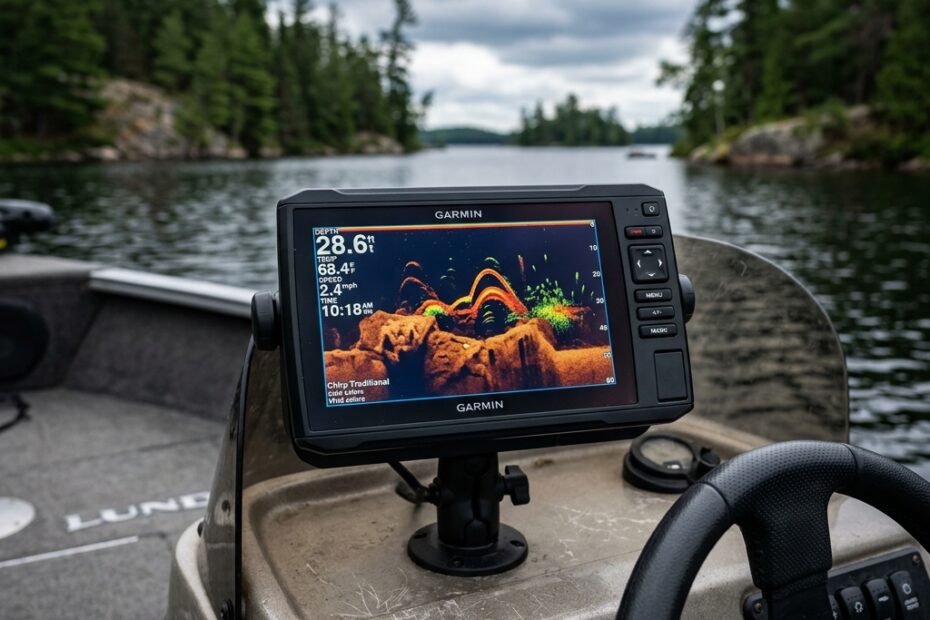
You bought the fish finder. You mounted it, powered it on, and looked at the screen. Then you spent the next three hours confused by a scrolling mess of colors, arches, speckles, and lines that meant nothing to you — while the fish kept not biting.
This is the experience of approximately every first-time fish finder user in Canada. The units themselves are extraordinary pieces of technology. The problem is that nobody teaches you how to read them before you leave the dock. This guide does that — from the physics of how sonar actually works, through reading every element on the screen, to the specific structural features that hold fish on Canadian lakes, and the settings that most guides never tell beginners to change.
⚡ Key Takeaways
- The right edge of the screen is NOW. Everything to the left is history. Read right to left — not left to right.
- Turn Fish ID mode OFF. The fish icons your unit draws are guesses based on arch shape — often wrong, always less useful than reading raw returns yourself.
- Arch length ≠ fish size. A long arch only means the fish stayed in the sonar cone longer. Arch thickness and intensity are better size indicators.
- Find the bait first. On Canadian Canadian Shield lakes, locate the baitfish cloud — walleye and lake trout are almost always within 2–3 metres of it.
- Ice fishing needs a flasher or dedicated ice unit — a standard boat transducer will not work through ice. These are completely different devices.
- Sensitivity (gain) is the single most important setting on any unit. Most beginners leave it too high and see noise instead of fish.
The Guide’s Log
The first time I actually understood my fish finder, I was on a Northern Ontario lake in 35 feet of water watching a single hard arch appear at 28 feet, a metre above a rocky hump I hadn’t even known was there. Thick return, bright orange-red core — that arch was a lake trout. I dropped a white tube jig to 29 feet and had it on within 90 seconds. That’s the moment it clicked: the screen is not showing you fish icons. It’s showing you sound echoes reflecting off density changes underwater. Once you understand density, you understand everything.
Part 1: How Sonar Actually Works (The Fast Version)
Your fish finder’s transducer sends a pulse of sound downward in a cone shape. That pulse travels through water, hits objects — the bottom, fish, vegetation, debris — and bounces back. The unit measures how long the echo takes to return and converts that into a depth reading and a signal intensity. Signal intensity is displayed as colour: red and orange mean strong echo (dense objects — rock, large fish), green and blue mean weak echo (soft objects — mud, small baitfish).
The cone widens as it goes deeper. At 10 feet, your 20-degree cone covers a circle about 3.5 feet across. At 40 feet, it covers 14 feet. This means that in shallow water, the unit is precise and detail-sharp. In deep water, you’re covering more area but with less resolution — and objects near the edge of the cone appear distorted.
The critical thing to understand: what you see on screen is a history scroll. The transducer fires multiple times per second. Each firing appears as a vertical line on the right side of the screen. The screen then scrolls left as new data arrives. The right edge of the screen is what is directly under your boat right now. Everything to the left is what you’ve already passed over.
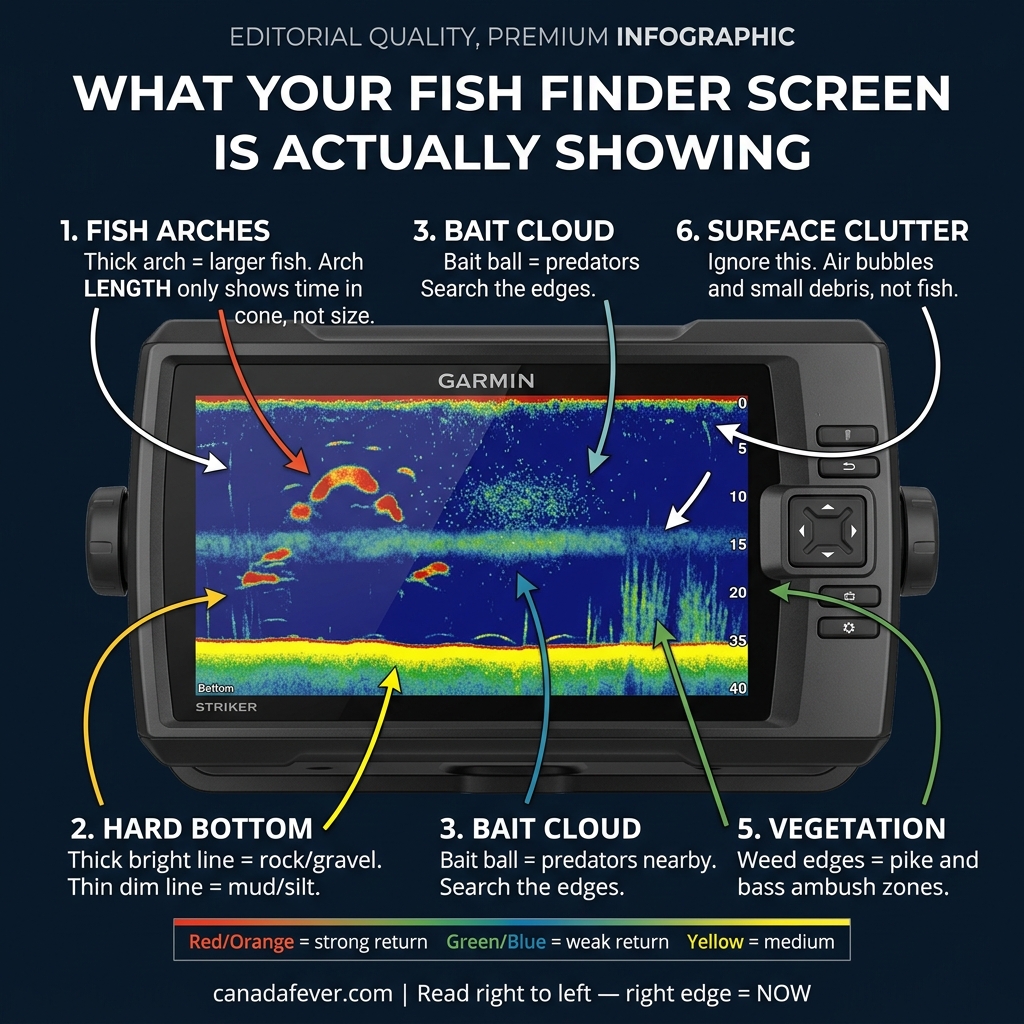
Part 2: Reading the Screen — 6 Returns and What They Mean
1. Fish Arches
Fish appear as arches because of the cone shape. As a fish enters the edge of your sonar cone while you’re moving, it’s recorded at the widest, shallower-looking point. As it passes through the cone’s center, the distance is shortest (strongest return). As it exits the far side, distance increases again — creating the arch shape.
- Arch thickness and intensity = size indicator. A fat, bright orange-red arch indicates a large, dense fish. A thin, faint blue-green arch could be a baitfish or a small perch.
- Arch length = time in cone only. A very long arch just means the fish was stationary or moving parallel to your direction of travel — it tells you almost nothing about size.
- Half arches are common and normal. If you catch a fish at the edge of your cone, or you’re moving too fast, you’ll see incomplete arches. These are still fish — look for the intensity, not the shape.
- No arches at all doesn’t mean no fish. Fish holding tight to structure (bottom, weeds, rocks) often don’t separate from the bottom echo cleanly enough to show as arches.
2. Bottom Hardness
The bottom appears as a line across the lower portion of your screen. How you read that line tells you the substrate below — which tells you where fish are likely to be holding.
- Thick, bright, hard-edged line (yellow/orange/red): Hard bottom — rock, gravel, or compressed sand. This is prime lake trout and walleye structure on Canadian Shield lakes.
- Thin, faint, blurry line (blue/green): Soft bottom — mud, silt, or detritus. Typically less productive except for specific species like catfish or burbot.
- Double line / echo: A second, fainter line just below the main bottom line indicates extremely hard bottom — bare bedrock. This is where you want to be for lake trout in summer.
3. Bait Clouds
Clouds of small, scattered returns in mid-water or just above the bottom are baitfish — cisco, smelt, perch, shiners. In Canadian lakes, the predators follow the bait. Finding bait clouds is often more valuable than finding fish arches directly.
- Look for the edges and bottom of bait clouds — walleye and lake trout typically stage just below the ball, picking off stragglers
- A bait cloud that suddenly compresses or dives means a predator just pushed through it — drop your presentation immediately
- Cisco (tullibee) mark heavily around the thermocline in late summer — this is the most reliable summer lake trout locator on deep Canadian lakes
4. The Thermocline
On Canadian lakes in summer, a thermocline forms — a layer where warm surface water meets cold deep water. It appears on your screen as a fuzzy, horizontal band, usually mid-water. This is one of the most important things your fish finder shows you.
- Most Canadian sport fish hold just above or just below the thermocline — the oxygen and temperature in the thermocline itself is inhospitable
- Lake trout: almost always below the thermocline in summer (cold water preference)
- Walleye and bass: typically above the thermocline, especially near structure
- The thermocline depth shifts seasonally — check it at the start of every trip, especially in August when stratification is most extreme
5. Vegetation
Submerged weeds and aquatic vegetation show as fuzzy vertical returns growing up from the bottom. The top edge of the weed bed is the key zone — pike, bass, and walleye all use the weed edge as ambush cover.
- Look for breaks, gaps, or pockets in the weed edge — these are the spots where fish stack
- Dense, tall weed beds (reaching to mid-column) on the map transition to an open sandy flat = classic walleye ambush setup
- Vegetation absorbs some sonar signal — arch detection in heavy weeds is unreliable. Trust the structure and fish the edges
6. Surface Clutter
The band of noise at the very top of the screen (0–2 feet) is surface clutter — air bubbles from the transducer, floating debris, and electrical interference. Ignore it entirely. It is never fish. Many beginners chase this noise for hours.
Part 3: The 5 Settings That Actually Matter
| Setting | What It Does | Common Mistake | Correct Approach |
|---|---|---|---|
| Sensitivity / Gain | Controls how sensitive the transducer is to returning echoes | Set too high — screen fills with green noise, every speck looks like a fish | Reduce until bottom line is sharp and mid-water clutter mostly disappears. Then raise 5% at a time until you see first faint returns |
| Frequency | Higher frequency = more detail, narrower cone. Lower frequency = wider cone, more coverage | Leaving at factory default regardless of depth | Under 20 ft: 200 kHz (detail). Over 40 ft: 77–83 kHz (coverage). CHIRP units manage this automatically |
| Depth Range | How many feet the screen displays vertically | Set to Auto, which wastes half the screen on empty water above and below | Set manually to 10–20% deeper than your current depth. If you’re in 30 ft of water, set range to 35 ft — the fish zone fills the whole screen |
| Scroll Speed | How fast history scrolls across the screen | Default speed compresses too much — arches look like blobs | Increase scroll speed to 75–100% when anchored or slow-trolling to see fish arches develop clearly |
| Fish ID Mode | Replaces raw sonar arches with fish icons | Leaving it ON — icons can be wrong, mask actual data, and don’t show depth accurately | Turn this OFF immediately. Read raw returns. You get the same information with higher accuracy and more detail |
🍁 The Local Secret
Ontario lake trout guides run their sensitivity deliberately low — low enough that only the strongest returns (fish, rock, hard structure) show, and most of the biological noise (plankton, suspended sediment, thermocline interference) disappears. The screen looks almost empty compared to factory settings. But every arch they do see is meaningful. They’re not looking for fish — they’re looking for fish worth fishing for. That distinction changes how you set up every unit you ever own.
Part 4: Finding Fish on Canadian Lakes — Structure Is Everything
Canadian Shield lakes — the granite-bedrock, cold, clear lakes that define fishing from Ontario through the NWT — have predictable structural patterns that you can find and mark with any GPS-equipped fish finder. Here’s what to scan for by species.
Walleye: The Drop-Off Edge Hunters
- Primary zone: 15–30 ft, on or just inside the edge of a depth change from shallow to deep
- Look for bottom transitions from hard (rock/gravel) to soft (mud/sand) — walleye stage on the hard substrate and face into the soft zone at dawn and dusk
- On the fish finder: scan for the depth contour where your bottom line drops from a shelf reading (flat line) into a slope (angled line). Mark it with a waypoint. Fish bite there.
- Bait clouds sitting at 20–25 ft in open water = walleye nearby. Scan lateral to the ball, not through it
Lake Trout: Cold Deep Structure Specialists
- Primary zone (summer): Below the thermocline, hugging rocky points, humps, and submerged reefs in 40–100 ft
- Look for a hard double-line bottom (bedrock) with at least 10 ft of open water above it — lakers suspend off rocky structure, not on mud
- In spring (June in Northern Ontario): lake trout roam shallow! Look for arches at 15–25 ft over the same rocky transition zones walleye use
- The best lake trout sonar image: a slight hump or rise in the bottom (from flat to a peak to flat again), with fish arches sitting 2–5 ft above the peak
Northern Pike: Weed Line Ambushers
- Primary zone: Surface to 15 ft, on or within 2–3 metres of the weed edge
- Pike are often invisible on the fish finder — they hold motionless in heavy vegetation where sonar can’t separate them from weed returns
- Use the fish finder to find the weed edge — the structural feature where the weed bed transitions to open bottom. That edge is where pike hunt. Mark it and fish it.
- In late summer: pike move deeper to follow cooling water. Look for them on weed edges in 12–20 ft, especially near points that drop into deeper basins
Part 5: Ice Fishing Sonar — A Completely Different Category
Ice fishing sonar is not the same equipment as a boat fish finder. A boat transducer will not transmit through ice. Ice fishing requires either a dedicated portable unit with an ice-mode transducer, or a traditional flasher. These are the three categories:
| Type | How It Works | Best For | Price Range |
|---|---|---|---|
| Flasher (Vexilar, Marcum) | Real-time circular display — fish appear as coloured bands on a rotating wheel. Zero history. | Perch, walleye, lake trout. Best for watching your jig and fish simultaneously in real time. | $200–$600 |
| Digital Ice Finder (Garmin Striker Portable, Humminbird Ice Helix) | Standard scrolling sonar display with ice-compatible transducer, runs on portable battery | Dual-use anglers who want one unit for both boat and ice seasons. GPS/mapping included. | $300–$800 |
| Live Sonar (Garmin LiveScope Ice Bundle) | Forward-facing live imaging — shows fish in real time up to 60 ft around the hole, including fish approaching from a distance | Serious lake trout and walleye ice anglers. Tournament-level fish finding. Game-changer for deep clear lakes. | $2,000–$5,000+ |
🍁 The Local Secret
Veteran Lake Simcoe walleye guides will tell you their flasher isn’t for finding fish — it’s for eliminating holes. They drill, drop the transducer, scan for 90 seconds, and if they don’t see consistent marks, they move. A guide working a whiteout day on Simcoe might drill 25 holes across a piece of structure before they find the concentration. The flasher makes that possible in under 3 minutes per location. Without it, you’d be sitting over an empty hole for an hour convincing yourself they’re “just not biting yet.”
Part 6: Brand Comparison — Garmin vs. Humminbird vs. Lowrance
| Brand | Strengths | Best For | Canadian Availability |
|---|---|---|---|
| Garmin | Industry-leading LiveScope live imaging; polished, intuitive UI; best GPS/mapping integration; excellent ice bundles | Beginners who want to learn fast; serious ice anglers; anyone wanting the best live sonar technology | Excellent — Bass Pro Shops, Cabela’s, Canadian Tire, Amazon.ca all stock Garmin |
| Humminbird | MEGA Imaging side/down scan is class-leading; excellent LakeMaster mapping for Canadian Shield lakes; strong all-season dual-use bundles | Anglers who want the best side-scan imaging for mapping structure; those splitting time between boat and ice | Good — Bass Pro, Cabela’s stock well; slightly less common at smaller retailers vs. Garmin |
| Lowrance | Highly customizable; strong mid-range value; good mapping; advanced users appreciate the tweakability | Experienced anglers who want to customize settings; offshore trolling; those who’ve outgrown entry-level Garmin | Moderate — specialty fishing retailers; less common in general sporting goods stores |
Recommended Fish Finders for Canadian Anglers

⭐ Best Budget Pick
Garmin Striker 4 with Portable Kit
The ideal first fish finder for Canadian lake anglers — CHIRP sonar with GPS waypoints, portable battery kit included, and a dead-simple interface that actually makes sonar reading teachable. Handles ice fishing with the portable transducer.

🏆 Best Mid-Range Pick
Humminbird Helix 5 CHIRP DI GPS G3
The jump to Down Imaging (DI) is a revelation for reading Canadian Shield lake structure — you see the bottom in photographic-style detail rather than a line. CHIRP sonar provides exceptional target separation for distinguishing individual fish. GPS/mapping built in.

🔴 Premium: Serious Ice Anglers Only
Garmin LiveScope Plus Ice Fishing Bundle LI
The gold standard for ice fishing sonar in Canada. LiveScope shows you fish in real time up to 60 ft away from the hole — you watch them swim in, react to your jig, and commit or turn away. Includes Navionics+ maps for Canadian inland waters. This is not a beginner’s unit — but for serious Lake Simcoe lake trout or Northern Ontario walleye ice fishing, nothing compares.
Pre-Trip Fish Finder Setup Checklist
- Turn Fish ID mode OFF — read raw sonar returns
- Set depth range manually to target water depth + 10–15 ft (not Auto)
- Calibrate sensitivity — reduce until bottom line is sharp, then increase just until first mid-water returns appear
- Set frequency — 200 kHz for <20 ft depth; drop to 83 kHz for deeper scanning or wide coverage
- Increase scroll speed to 75%+ if you’re fishing slow or anchored
- Verify transducer angle — should point straight down; a tilted transducer creates distorted bottom lines and false returns
- Check battery voltage on the unit — low voltage causes erratic sonar readings that look like fish aren’t there
- Mark your first productive waypoints as soon as you find structure or fish — GPS memory is the most underused feature on most Canadian anglers’ units
More Canadian Fishing Tech and Technique Guides
- Ice Fishing Tips for Beginners — Lake Simcoe to Northern Ontario
- How to Tie a Fishing Hook — Knots for Canadian Species
- How to Unhook a Fish — The Canadian Catch-and-Release Standard
- Canada’s 12 Best Fishing Lakes — By Access Tier
- Northern Pike Fishing: Finding the Weed Edges
Frequently Asked Questions: Using a Fish Finder in Canada
Why can’t I see fish on my fish finder even though I know they’re there?
Several reasons: Fish holding tight to structure (bottom, weed beds, rocks) often merge with the structure return and don’t appear as separate arches. Fish that are completely stationary don’t generate a cone-crossing arch — you need some relative movement between the boat and the fish for an arch to form. Sensitivity may be set too low, cutting out weaker fish returns. Or fish are in the cone boundary (cone edge distortion) and appearing as noise rather than arches. Try reducing your boat speed to almost nothing, increasing sensitivity slightly, and scanning the area multiple times from different angles.
What’s the difference between CHIRP sonar and traditional sonar?
Traditional sonar fires a single frequency pulse (e.g., exactly 200 kHz) and reads the echo. CHIRP (Compressed High-Intensity Radar Pulse) instead sweeps a range of frequencies in each pulse (e.g., 150–200 kHz) and processes the composite return. The result is dramatically better target separation — the ability to distinguish individual fish from adjacent fish, fish from bottom, jig from fish. For Canadian walleye and lake trout fishing where you often have multiple fish stacked at similar depths near structure, CHIRP is meaningfully better. Most modern units (Garmin Striker and above, all Humminbird Helix models) are CHIRP.
Can I use my boat fish finder for ice fishing?
No. A standard boat transducer cannot transmit sound through solid ice — the transducer requires water contact to function, and the coupling through ice is insufficient. For ice fishing you need either: a portable unit with a dedicated ice-mode transducer (designed to sit in a small amount of water on the ice surface), or a traditional flasher (Vexilar, Marcum) designed specifically for through-ice use. Some units like the Humminbird Ice Helix and Garmin Striker Portable come with dual transducers — one for boat mounting and one for ice — making them genuine all-season solutions.
Should I use GPS mapping on my fish finder?
Absolutely — it’s the second most powerful feature after sonar itself, and most anglers massively underuse it. GPS mapping lets you mark productive waypoints (the drop-off where you found walleye, the rocky hump with lake trout holding above it) and return to them exactly on future trips. It also lets you use contour map chips (Navionics, LakeMaster, Humminbird’s AutoChart) to pre-identify structure before you even reach the water. For remote Canadian Shield lakes that aren’t on commercial charts, AutoChart Live (Humminbird) and Garmin’s Quickdraw Contours let you build your own depth map in real time as you troll across the lake.
If the screen still feels confusing, the broader fish finders and fishing electronics guide can help you decide whether the problem is unit choice, transducer setup, battery power, mapping, or interpretation.