Good fly tying tips help you make lures that catch more fish. Practice and the right advice make a big difference.
In a Nutshell: Fly Tying Tips
- You will learn basic tools and simple steps to start tying flies.
- You will discover tips to make your flies look better and last longer.
- You will find ways to get organized and improve your skills faster.
Estimated reading time: 5 minutes
Do your homemade flies fall apart too soon? Or maybe they just don’t look right? Learning fly tying takes time. But some simple tips can help you improve quickly. Let’s explore how you can tie better flies today.
Getting Started: Tools and Basics
Fly tying means making your own fishing lures (flies). You need a few key tools to begin.
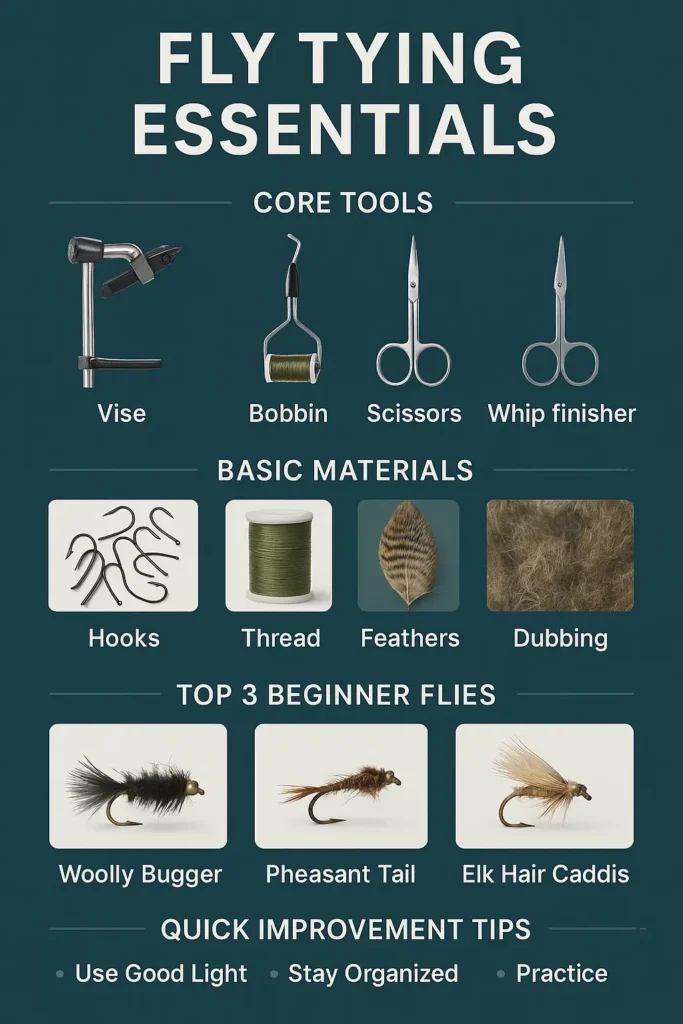
- Vise: This holds the hook steady while you work. A good vise is important. Some experts suggest investing in quality tools right away.
- Bobbin: This tool holds your thread spool. It helps you wrap thread smoothly.
- Scissors: You need small, sharp scissors. They cut thread and materials cleanly.
- Whip Finisher: This tool helps you tie the final knot. It makes your fly secure.
You also need materials:
- Hooks: Different sizes and shapes for different flies.
- Thread: Comes in many colors and thicknesses.
- Feathers & Fur: Used for wings, tails, and bodies.
- Dubbing: Fluffy material for making bodies.
- Extras: Things like tinsel or beads add flash or weight.
Start with simple fly patterns. The Woolly Bugger is a popular choice for beginners. It teaches basic skills. You can find many helpful videos online to show you the steps.
Beginner Fly Tying Tools Checklist
Simple Tips for Tying Better Flies
Improving your fly tying is about practice and good habits.
Here are key fly tying tips:
- Keep it Simple: Don’t try complex flies too soon. Master basic ones first. This builds confidence and skill.
- Use Good Light: Seeing clearly is vital. Tie flies in a well-lit area. A desk lamp helps a lot.
- Control Your Thread: Learn to use only enough thread wraps. Too much thread builds up bulk. Keep thread tension steady.
- Proportions Matter: Look at pictures of real insects or finished flies. Try to match the size and shape. A fish is more likely to bite a fly that looks natural.
- Practice One Step: If you struggle with a step, like finishing the knot, practice just that step. Tie the knot on a bare hook several times.
- Stay Organized: A clean workspace makes tying easier. Keep your tools and materials tidy. Use small boxes or containers.
- Fewer Wraps: Use only enough thread wraps to secure material. Less bulk looks better.
- Consistent Tension: Keep steady pressure on your thread. This prevents loose wraps.
- Clean Finish: Make your whip finish knot small and tight right behind the hook eye.
- Trim Close: Cut tag ends of thread and materials very close for a neat look.
Taking Your Skills Further
Once you master the basics, try new things. Advanced fly tying tips can make your flies even better.
- Learn New Knots: The whip finish is standard. But other knots can be useful too.
- Try Different Materials: Experiment with new feathers, synthetics, or dubbings. See how they look and work in the water.
- Focus on a Style: Get really good at one type of fly. Maybe you love tying dry flies that float high. Or perhaps heavy nymphs for deep water. Mastering one style builds deep skill. Some tyers focus on specific patterns like Euro nymphs.
- Join a Group: Connect with other fly tyers. Local clubs or online forums are great places to share tips and get feedback. Learning from others speeds up progress. You can even find workshops or classes.
Organizing Your Fly Tying Space
A messy desk makes fly tying harder. Good organization helps you work faster and better.
- Tool Caddy: Some vises have built-in holders for tools. Or use a small cup or block with holes. Keep scissors, bobbins, and whip finishers close.
- Material Storage: Use clear plastic boxes or drawers. Label them so you can find feathers, dubbing, or hooks easily. Small zip bags also work well inside boxes.
- Bead Management: Tiny beads and hooks roll away easily. A silicone mat or a shallow dish can keep them contained.
- Trash Bin: Keep a small trash bin nearby. This helps manage waste thread and material scraps quickly.
Having everything in its place means less searching and more tying. It makes the whole process smoother. Check out some beginner fly fishing gear tips for more ideas.
Final Thoughts
Fly tying is a fun and useful skill for any fly fisher. Use these fly tying tips to get started or improve. Remember to be patient with yourself. Practice often. Soon, you will be tying flies that look great and catch fish. Enjoy the process! Find great fly fishing spots in Canada to test your creations.
Your Questions About Fly Tying Tips Answered (Simply)
What is the easiest fly to tie for beginners?
What basic tools do I really need for fly tying?
How can I make my flies more durable?
How do I choose the right hook size?
How important is using the exact materials in a pattern?
Where can I find good fly tying tutorials?
How often should I practice fly tying?