

Discover essential tips for kayak fishing with electronics and learn how to choose the best fish finders for your paddling adventures in Canadian waters. Get expert guidance here
- Match Kayak Fishing with Electronics to your water, season, boat size, and actual skill level instead of buying by specs alone
- Prioritize readable controls, durable construction, and Canada-relevant use cases before chasing premium features
- Use the guide to compare what matters in the field: setup time, reliability, safety, storage, and upgrade path
Bottom line The right Kayak Fishing with Electronics choice solves your real Canadian trip conditions without adding gear you will not use
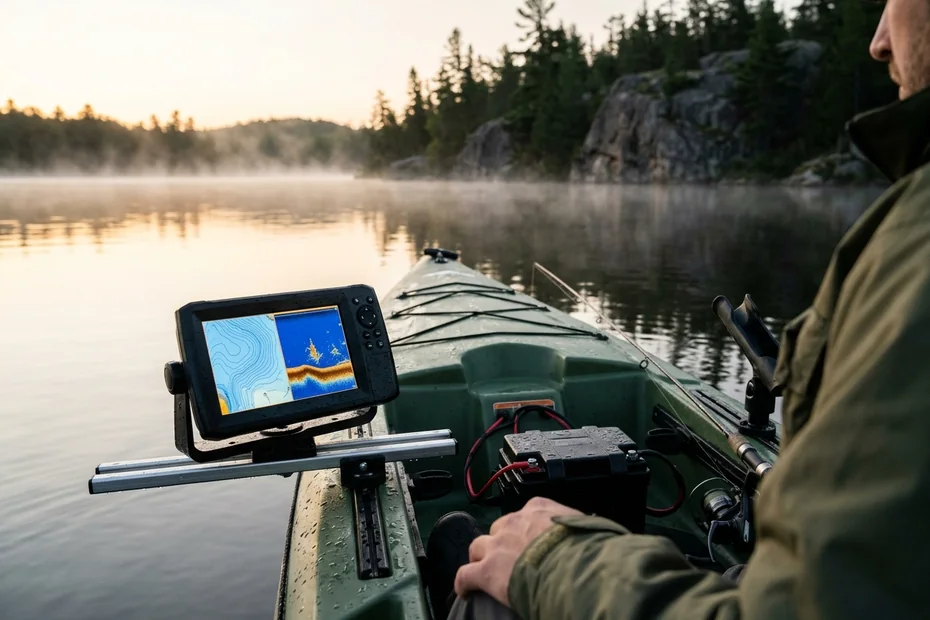
Rigging electronics on a fishing kayak changes how you read Canadian water, turning blank drift lines into repeatable catches over deep Shield humps, weed-edge walleye breaks, and mid-column trout basins.
Unlike motorized aluminum boats with built-in alternators and dry bilge lockers, a fishing kayak sits inches off the lake, collects spray over every gunwale wave, and runs on whatever compact battery fits inside a bow or under-seat hatch.
This guide explains exact 12-volt LiFePO4 battery sizing for cold northern mornings, waterproof marine circuit fusing, transducer mount physics across scupper, track-arm, and in-hull options, sonar interference troubleshooting, and Canadian cold-water reliability habits.
Battery Sizing Math for Canadian Kayaks and Cold Mornings
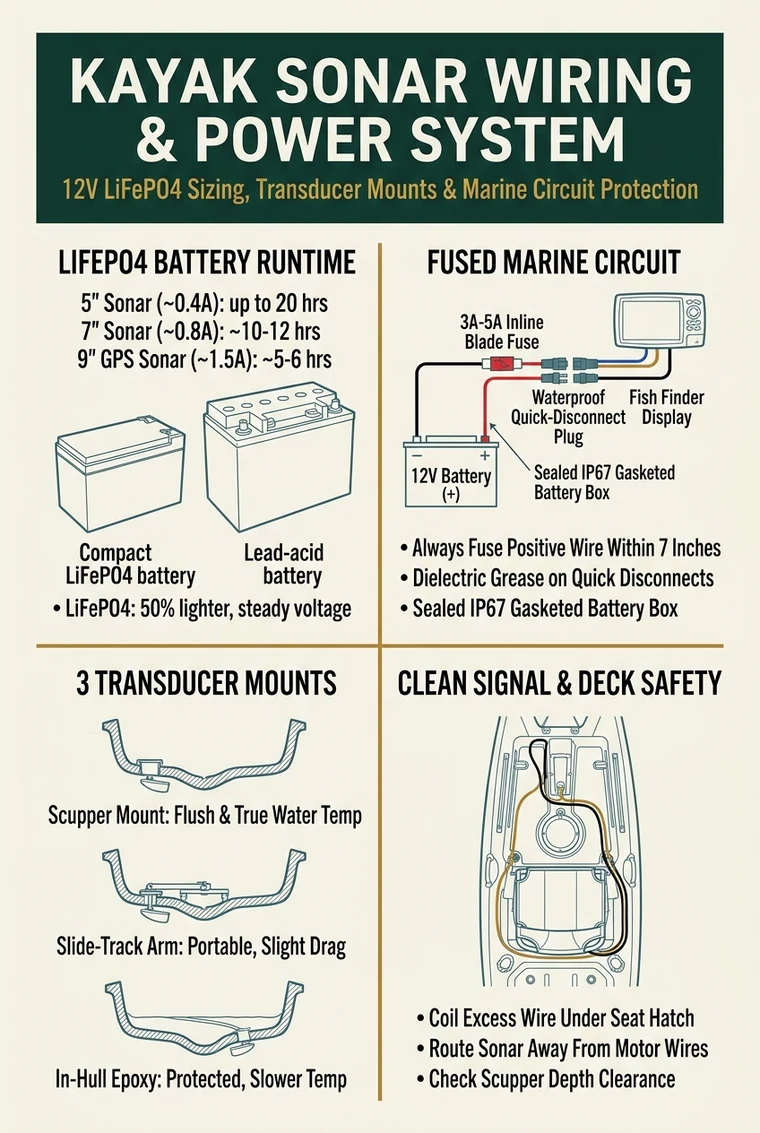
Choosing a kayak sonar battery starts with amp draw, not marketing claims printed on plastic packaging. A compact 4-inch or 5-inch CHIRP unit typically draws roughly 0.4 amps at 12 volts, a bright 7-inch screen averages 0.8 amps, and a 9-inch unit with SideScan and active GPS mapping climbs near 1.5 amps.
If your boat runs a larger motor bank alongside dedicated boat electronics, step up from kayak boxes to our Canadian marine batteries and chargers guide, or review kayak power packs inside our kayak trolling motor battery overview.
| Battery Spec | Sealed Lead-Acid (SLA) | LiFePO4 Lithium (12V 10Ah) | Kayak Field Impact |
|---|---|---|---|
| Typical Weight | 5.5 to 6.5 lbs (for 10Ah) | 2.6 to 3.1 lbs (for 10Ah) | Cuts deck top-heaviness and saves trim capacity for tackle |
| Usable Capacity | 50 percent (~5Ah safe draw) | 85 to 95 percent (8.5Ah+ safe) | Nearly double real run-time from the same rated amp-hour label |
| Voltage Curve Under Load | Drops below 11.5V rapidly | Holds ~12.8V to 13.2V flat | Prevents screen dimming or sonar reboot when fish finders ping deep |
| Sub-Zero Charging Rule | Accepts slow float charge | Never charge below 0°C unless heated | Bring LiFePO4 cells inside the cabin on frosty October nights |
Why Cold Shield Water Trims Nominal Run-Time
Every battery chemistry loses chemical efficiency when air and hull temperatures drop close to freezing during May ice-out lake trout trips or November walleye jigs. Even though lithium iron phosphate handles discharge far better than older lead-acid bricks, internal resistance still ticks up at 2°C water temperatures.
- Dim backlight deliberately: Running a 7-inch LCD screen at 70 percent brightness instead of 100 percent cuts amp draw by 15 to 25 percent during overcast Canadian Shield days.
- Put sonar in standby on long paddles: Stopping the transducer ping while crossing open water for 45 minutes conserves amp-hours and silences unnecessary clicks near skinny river runs.
- Use a dedicated LiFePO4 charger: Never hook an old automotive trickle charger with a desulfation pulse mode onto a lithium kayak pack, because high voltage spikes can trip the internal Battery Management System (BMS).
- Inspect voltage before leaving shore: Keep a tiny waterproof voltmeter or read the sonar screen voltage overlay at launch; 13.2V to 13.4V indicates a rested full LiFePO4 pack, while 12.6V or lower signals partial depletion.
Worked Sizing Example (Georgian Bay Day Trip): Suppose you paddle out at 6:00 AM for nine hours with a 7-inch CHIRP unit pulling 0.8A continuous. Total raw draw equals 7.2 Ah (0.8A x 9h). Adding a 20 percent cold-morning and voltage-loss reserve pushes required usable capacity to 8.64 Ah. A standard 12V 10Ah LiFePO4 pack covers the entire day safely with buffer left over, whereas a 12V 9Ah SLA lead-acid block yields only 4.5 usable Ah and dies right around lunchtime.
Waterproof 12V Wiring, Fusing, and Corrosion Prevention
Saltwater spray along coastal British Columbia or Nova Scotia inlets, plus constant bilge condensation on freshwater portages, destroys bare automotive crimps within a single summer. Building one clean, marine-grade harness saves every head unit from green copper corrosion and sudden power blackouts miles from the launch ramp.
Use tinned copper 16 AWG marine wire, adhesive-lined marine heat-shrink butt connectors, and corrosion-resistant waterproof quick-disconnects. When paddling home in dark coastal conditions or unloading at the ramp, unplugging one IP67 connector lets you carry your battery box and fish finder head unit inside immediately without wrestling wingnuts in the dark.
Fuse Rating & Short-Circuit Rule: Never bypass the factory inline blade fuse supplied inside your fish finder harness, and always use the manufacturer’s specified amperage (commonly 3A for 5-inch/7-inch displays or 5A for larger side-imaging screens). A crushed wire inside a seat track shorting straight across a lithium pack delivers massive fault current fast enough to melt deck plastic without fuse protection.
Comparing Scupper, Slide-Track Arm, and In-Hull Transducer Mounts
A modern CHIRP or side-imaging transducer only shows crisp arches if the puck face sits parallel to the lake bottom and clean, bubble-free water passes over its acoustic crystal. Choosing the wrong mount style wastes half the performance you paid for in the head unit.
Before drilling any deck plate on a brand-new hull, compare models in our portable fish finders for kayak fishing guide and Garmin Striker vs. Humminbird Helix comparison.
| Mount Style | Side-Imaging Support | Water Temp Accuracy | Best Canadian Water Use Case |
|---|---|---|---|
| Recessed Scupper Mount | Partial (must clear hull edges) | Immediate & exact | Permanent single-kayak Shield lakes and open-water trolling |
| Slide-Track Over-Side Arm | Full unobstructed 180° beams | Immediate & exact | Multi-kayak rigs, SideScan units, or quick removal for shallow rapids |
| In-Hull Shoot-Through | None (side beams bounce off plastic) | Delayed 10 to 20 min (reads hull) | Shallow granite rivers, rocky boat launches, and ultralight canoes |
Why Side-Imaging Needs Unobstructed Over-Side Clearance
If your sonar unit includes SideScan or DownVü beams projecting outward left and right at shallow angles, tucking the transducer deep inside a narrow scupper tunnel blocks half the side beam against your polyethylene hull walls. Instead, mount a folding track arm along the mid-ship gear track so the transducer sits two centimetres below the keel line while paddling calm flats, and flip the arm upright above gunwale height whenever scraping over beaver dams or rocky launches.
- In-hull epoxy rules: If choosing shoot-through installation with marine duct seal or slow-cure two-part epoxy, press out every single microscopic air bubble underneath the transducer face; trapped air scatters sonar waves instantly.
- Clean hull cavities: Avoid shooting through double-walled thermoformed hulls or foam floatation cores, because hollow foam deadens acoustic return completely.
- Manage excess cord neatly: Coil spare three-metre transducer cable inside a dry front hatch or wrap onto a flat cable organizer rather than stuffing tight kinks under the seat frame where aluminum rails pinch insulation.
Optimizing CHIRP, Down-Imaging, and GPS Contours From a Kayak
Kayaks drift silently at 0.5 to 2.5 miles per hour, which is actually slower than the minimum scroll speed many boat fish finders default to out of the box. Adjusting just four factory settings prevents blurred arches and crowded screen clutter when vertically jigging lake trout or drifting kayak fishing tackle setups across weed points.
- Match chart scroll speed to paddle pace: Slow scroll speed to slow or medium while anchored or hovering at 1 mph; fast boat scroll streaks fish hooks into thick horizontal bars.
- Run 200 kHz high-CHIRP for vertical jigging: Narrow 200 kHz cones pinpoint jig heads right under your seat, while wider 77/83 kHz cones help search broad flats when covering shoreline weed edges.
- Dial sensitivity just above light fleck: Increase sonar gain manually until a few harmless water-column specks appear on display, ensuring soft bottom targets and suspended crappie or perch still register cleanly.
- Record free personal contour maps: Built-in quick-contour logging turns unmapped remote back-lakes into private 1-foot bathymetry charts stored directly onto your head unit or microSD card.
Once electronics locate suspended fish along river eddies or deep reefs, pair screen interpretation with our broader fish finders and marine electronics buyer guide and fish finder reading guide.
4-Step Kayak Sonar Rigging & Launch Inspection Sequence
Run this quick pre-season and launch-ramp sequence before casting into deep Shield lakes, keeping your electrical installation compliant and reliable across wet Canadian launches under Transport Canada boating safety rules.
- Dry-fit track ergonomics first: Sit in your kayak seat holding your primary rod and paddle to make sure a track-mounted screen never blocks forward paddle strokes or catches your casting arc.
- Seal and strain-relieve every bulkhead pass-through: Install proper rubber deck grommets or waterproof thru-hull wiring glands cleanly above the cockpit waterline, sealing unused gaps with marine silicone.
- Bench-test power and interference before leaving camp: Power up the unit at home with the trolling motor running (if equipped) to detect vertical RF noise bars early; route transducer wire on the opposite gunwale from motor power leads.
- Pack spare fuses and lens cloth in a waterproof box: Tape two spare 3A or 5A blade fuses inside the gasketed lid of your battery case and bring polarized screen-safe microfiber cloths for dried lake-spray spots.
Interactive Kayak Sonar Battery Runtime & Safety Margin Calculator
Enter your screen amp draw, trip duration, battery amp-hour rating, and battery chemistry below to calculate safe estimated runtime including cold-water safety margins.
Verified Kayak Sonar, Battery & Track-Mounting Gear
Recommended field hardware checked for marine durability and compatibility with modern sit-on-top kayaks. All product cards below link directly to Amazon with standard disclosure.
CanadaFever participates in affiliate programs. We may earn a commission on qualifying purchases made through links on this page at no additional cost to you.
Garmin Striker Cast GPS Castable Sonar
- Streams clear traditional and flasher sonar scans up to 200 feet directly to your phone screen
- Zero permanent hull drilling, deck mounts, or external 12V batteries needed for ultralight rigs
- Built-in GPS logs custom 1-foot depth contour maps on remote Canadian Shield lakes
ExpertPower 12V 10Ah LiFePO4 Rechargeable Battery
- Maintains steady 12.8V+ output to power 7-inch CHIRP units across 10-hour fishing days
- Weighs roughly half as much as equivalent 10Ah lead-acid batteries inside compact hatch boxes
- Integrated BMS safeguards cells against over-discharge and short circuits on rough crossings
WINDFRD Fish Finder Track Mount & Transducer Arm
- Attaches directly onto standard kayak gear tracks without permanent hull epoxy or scupper cutouts
- Telescoping side arm flips cleanly clear of rocks, beaver dams, and shallow gravel launches
- Fits standard Garmin, Lowrance, and Humminbird bracket plates on one adjustable ball mount
Frequently Asked Questions & Official Sources
Can I run a fish finder from a standard USB power bank instead of a 12V battery?
Most fixed-mount sonar units require 10.5V to 17V DC and cannot operate stably off standard 5V USB ports without inefficient step-up converters that introduce screen noise. Unless you choose a USB-rechargeable castable puck like the Garmin Striker Cast, use a dedicated 12V LiFePO4 battery with inline fuse protection.
Do scupper mounts lose side-imaging performance compared with slide-track arms?
Often yes. Side-imaging beams radiate sideways just below the water surface, so a deeply recessed scupper cavity blocks part of the left and right beams against the kayak hull. Use an over-side slide-track arm when running SideScan or Mega Side Imaging.
Should I remove my lithium kayak battery during freezing Canadian winter storage?
Yes. Store LiFePO4 packs indoors in a dry basement or closet at around 40 to 60 percent charge over winter, and never attempt to recharge lithium iron phosphate cells while their internal temperature sits below 0°C unless the battery explicitly specifies built-in self-heating.
Does a depth finder count toward Transport Canada safety equipment rules?
No. Electronic fish finders, chartplotters, and mobile sonar apps do not replace any mandatory equipment under Transport Canada’s Small Vessel Regulations (SOR/2010-91), such as a fitted PFD, sound-signalling whistle, 15-metre heaving line (when PFD is not worn), or watertight flashlight for low light.
Why does my sonar screen show thick vertical static lines whenever I throttle my kayak trolling motor?
Pulse-width modulated electric trolling motors radiate electromagnetic interference across nearby unshielded cables. Separate the transducer cable to the opposite side of the hull from motor leads, avoid running both devices off the exact same small battery when possible, and check negative grounding connections.
Is a 7-inch or 5-inch fish finder better for narrow sit-inside fishing kayaks?
For tight sit-inside cockpits or skinny-water paddlers, a 5-inch screen maximizes paddle clearance and cuts power draw in half. Reserve 7-inch units for wide 32-to-36-inch sit-on-top kayaks where you plan to run split-screen GPS mapping alongside down-imaging.
Official & Safety Sources Checked (November 2026)
Seasonal Kayak Electronics Care Across Canadian Climates
Water condensation inside sealed hull cavities during rapid spring-to-autumn temperature swings catches many weekend paddlers off guard. Even IPX7 waterproof head units develop mineral crust along gold connector pins when stored damp inside unventilated truck caps or sheds.
Wipe every marine plug dry after unloading at the boat launch, leave your battery box lid slightly cracked open overnight inside a heated mudroom so trapped moisture escapes, and cap exposed transducer plugs with tethered rubber dust boots before strapping your kayak onto roof crossbars for highway travel.
- Highway travel protection: Unclip the screen from its deck gimbal mount and stash it inside a padded dry bag in the vehicle cab; bugs, gravel chips, and 110 km/h rain storms strain gimbal locking rings unnecessarily.
- Tidal salt rinse discipline: After coastal salmon or rockfish launches off Vancouver Island or Bay of Fundy shorelines, flush every aluminum gear track bolt and transducer hinge with fresh hose water before crystallization locks swivel teeth.
- Firmware and contour backups: Back up personal lake contour waypoints to a laptop microSD adapter at season end so a cracked spring screen never erases three summers of deep Shield reef drops.
- Check winter maintenance: Coordinate off-season lithium storage and transducer mount checks with our full kayak maintenance checklist for Canadian anglers and kayak storage solutions guide.
Using GPS Waypoints & Bathymetric Shading for Seasonal Canadian Patterns
Modern kayak sonar screens do far more than paint passing yellow walleye arcs directly below your hull. Built-in depth shading highlights allow you to paint specific high-percentage bands bright green or amber, making seasonal migrations effortless to follow during silent morning paddles across sprawling Shield basins.
Set shallow colour highlights between six and twelve feet during May walleye windward shore feeds, then shift that bright alert ribbon down to twenty-two through thirty feet when clear July sunlight drives fish onto deep mid-lake gravel humps. As you paddle quietly past drop-offs in a kayak using kayak drift fishing techniques, bright bathymetric edges immediately expose sharp inside turns where baitfish stack.
Always export valuable sonar logs and shore-access trailhead coordinates onto microSD backups twice each summer. If a submerged rock chip ever cracks a mounting bracket or cold spray compromises a display seal in remote northern Quebec, fresh chart backups preserve every productive shoal pin onto any replacement head unit inside sixty seconds.
Pairing Castable Sonar Units With Lightweight Shoreline & Portage Craft
Anglers hiking gravel logging trails to tucked-away Shield brook trout potholes or portaging lightweight forty-pound canoes do not always want external track rails, 3-pound lithium battery boxes, and deck wires cluttering narrow thwarts. A palm-sized castable GPS sonar paired inside a watertight lanyard phone pouch drops total electronics weight down below four ounces.
Cast the buoyant puck out past sunken cedar blowdowns right from bank rocks or drift slowly behind an inflatable packraft to map shallow spring spawner shoals before stepping out with ultralight jigs. Even full-time motorized boat owners often stash one castable unit inside winter ice shelters as a reliable emergency flasher backup when sub-zero temperatures strain larger lithium displays.